How to Add an Outlet to an Existing Three-way Switch
How to Install a 3-Way Switch
Convert an existing two-way switch to a three-way switch and run new wire to the second switch location.
 Family Handyman
This article shows you a simple technique for adding a second switch to a stairway light or a light in any room in your home. It covers running new electrical cable and connecting both switches, and replacing undersized electrical boxes. Make your house safer and more convenient by following these how-to photos for adding a second light switch.
You might also like: TBD
- Time
- Complexity
- Cost
- A full day
- Intermediate
- $51–100
Make life easier with a three-way switch
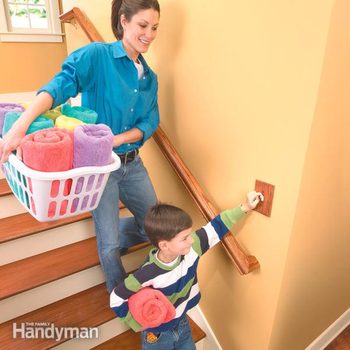
Tired of having to walk up a flight of stairs or across the room to turn on a light? The solution is to add a second switch in a convenient location.
No more extra trips across the room or fumbling up a dark stairway. Controlling a light from two switches is a bit more complicated than first meets the eye, especially if you're dealing with finished walls. The key ingredient is a special type of switch called a "three-way" switch. You'll need two of them, one to replace the existing switch and another for the new switch location. With these, you'll have the convenience of turning a light on and off from two spots.
In this article, we'll show you how to run a new electrical cable and connect the two switches. We'll also tell you how to resolve the most common complication—replacing an undersized electrical box so your work is safe and conforms to the electrical code.
While this project isn't difficult, it does require basic electrical skills: running cable correctly and making solid wiring connections. If you don't have wiring experience or if you get in over your head, don't hesitate to call in a licensed electrician. Apply for an electrical permit at your local inspections department before starting so an electrical inspector can check your work.
If your wall framing is open (an unfinished basement or garage, for example), you can easily run the new cable and complete this job in only two hours. However, if the cable has to run through closed walls allow several more hours.
In addition to standard tools, you may need a "fish tape" to pull wire in closed walls. Also, if you don't have a voltage detector, buy one so you can check for live wires and avoid hazardous shocks. You can find them at a home center or hardware store.
How to Install a Switch: Plan the wire path
To start, decide where you want the second switch. You'll run cable from the existing switch to this new switch location, so look for the most accessible path between the two (Figure A).
If possible, start at one switch location, run the cable straight up through the stud cavity in the wall to the attic, then come back down through the wall to the second switch. Or feed the cable down into the basement or crawl space, then come back up. If neither option works for your situation, you may have to run cable horizontally through the walls or through the ceiling. This takes extra effort because you have to cut into, and later repair, finished surfaces. Avoid exterior walls, where you'll run into obstacles such as windows, doors and insulation.
If you can't find an unobstructed path for the cable, move the new switch location. Once you decide on a path, measure the amount of cable you need, then add 10 ft. so you'll have plenty to work with. It's better to waste a couple of feet than to come up short!
You'll also need a wire stripper, 14-3 or 12-3 cable (match existing wire gauge.), two three-way switches and two remodeling boxes.
Figure A: Typical Cable Paths
To add a second switch, find the easiest way to run a new cable from the existing switch to the best second switch position.
How to Install a Switch: Prep the switch locations
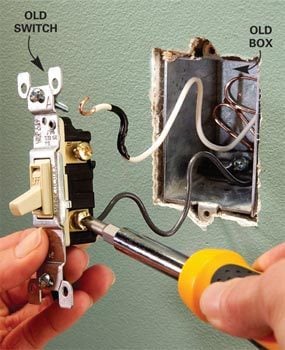
Photo 1: Remove the existing switch
Remove the cover plate to the existing switch (the power is off). Then unscrew and remove the switch. Cut the electrical box loose and remove it.
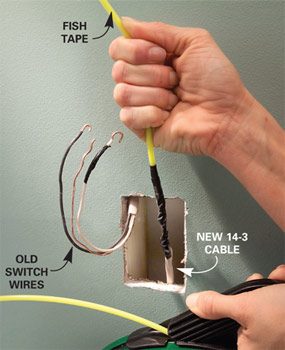
Photo 2: Fish cable to the new switch box
Cut a hole for the second switch box. Drill holes as needed in the framing and fish a new cable through the wall back to the old switch position.
Shut off power to the existing switch, unscrew it from the electrical box and pull the switch out of the box. Avoid touching the screw terminals until you confirm that the power is off with your voltage detector. If the detector lights up, then the power is still on. Find the circuit breaker (or fuse) that shuts it off.
Unhook the wires to the switch (Photo 1). In most cases, the existing electrical box will be too small to contain the additional wires and connectors needed for the three-way switch (see "Sizing the Box," below, to find out). You'll have to replace the old box with a "remodeling box" anyway so you can pull in the new cable (Photo 3). A remodeling box has clamps that secure the cable to the box. You can mount it solidly in drywall without cutting open the wall.
Label and unhook any wire connections that are inside the existing box (wires that weren't connected to the switch). Then unscrew the grounding screw and cable clamps (if any) in the box. Slip a hacksaw blade between the old box and the wall stud and cut the nails. (You may have to pry the box away from the stud slightly to create space for the blade.) Saw with short strokes to avoid damaging the drywall on the other side of the wall.
You'll probably have to enlarge the wall opening slightly for the new box. Simply use the new box as a pattern, trace around it on the wall, and enlarge it with a drywall saw. Don't cut the hole too large; you want a tight fit.
Next, fine-tune the position for the second switch. Use a stud finder to find potential obstacles, such as framing. If possible, keep the second switch the same height off the floor as the first switch. Trace an outline of the box on the wall, then cut the opening with a drywall saw. Don't mount the new boxes until you run the new cable.
CAUTION!
Turn off power at the main circuit breaker panel before unhooking the existing switch, then check the wires with a voltage detector to verify that the power is off.
Key Wiring Components: 3-Way Switches and 14-3 Cable
Three-way switches are always installed in pairs to control a light from two locations. The switches have three hot screw terminals—one "common" and two "travelers"—and a grounding terminal. The position of the screws varies by manufacturer, but the common terminal is always a different color than the other two hot terminals.
Unlike other switches, you won't see "On" and "Off" markings on the toggle, since either switch can control the light. You'll find 14-3 cable at any home center or hardware store. If the circuit breaker is 20 amps rather than 15 or the existing wire is 12 gauge, use size 12-3 cable.
Run 14-3 cable between the switches
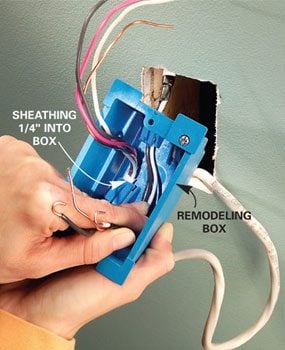
Photo 3: Pull the cables through the box
Insert the cables into a remodeling box from the backside at each box location. Pull the cables from the front as you push the boxes back into the wall.
We won't go into the details of running the cable, because each situation is different. But if the walls are open, your job is easy. Drill a 3/4-in. hole into the center of each stud between the box locations and run 14-3 cable from one box opening to the other. If you're going up through an attic or down through an open basement, drill through the center of the wall plates (top and bottom framing members).
If you can't go up or down, you may have to run the cable horizontally through finished walls. If so, cut a 3-1/4-in. by 5-in. slot into the drywall at each stud, notch the studs, fish the cable though the wall, leaving at least 18 in. of cable projecting from each opening, then tuck it into the stud notches. Cover the notch and cable with special nail guards and patch the drywall holes.
Strip 12 in. of sheathing off the ends of the new cable. Insert the cable into the electrical boxes from the backside (Photo 3). It's easier to push cable through the back than to pull it from the front. The first switch location has an existing 14-2 cable running to the light. Wrap the cable with electrical tape where the sheathing ends to help it slide into the box.
Pull the cables from the front as you slide the box into the wall opening. Pull the cable at an angle that minimizes pressure on the plastic cable clamp in the box. Otherwise, the sheathing could snag or the clamp could break. The cable sheathing should extend 1/4 in. into the box (the clamps should push against the sheathing and not the wire; see Photo 6) and make sure the wires extend at least 3 in. past the outside edge of the box when the box flanges are snug against the wall. Tighten the screws at the top and bottom of the box to clamp it into place.
Figure B: 3-Way Switch Wiring
The key to wiring two three-way switches is to run the two wires that were originally connected to the old switch (Photo 1) to the "common" terminals. The "travelers" can go to either terminal.
Wire the switches

Photo 4: Attach the wires to the switch
Clamp the first electrical box to the wall. Connect a three-way switch, the ground wires and all other wires following Figure B.
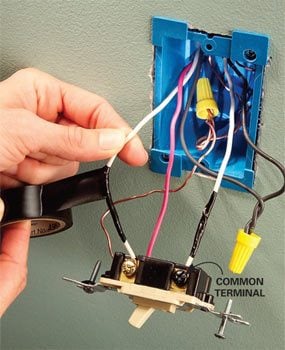
Photo 5: Tape the hot white wire
Wrap the second white wire with black tape to show that it acts as a hot wire. Fold the wires back into the box and screw the switch into place.
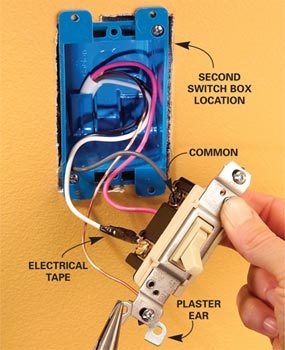
Photo 6: Attach the second switch
Clamp the second electrical box to the wall and wire a three-way switch, following Figure B. Snap off the plaster ears and install the switch.
Strip 3/4 in. of insulation from the end of each wire, then connect the wires following Figure B and Photo 5. The black electrical tape on the white wire indicates that it's a hot rather than a neutral. For secure connections, hook the ends with a needle nose pliers before placing them under the screw terminals (Photo 4). Make sure the wire ends face clockwise around the screw for better clamping strength.
Clip the plaster ears off the switches so they'll fit tight on the remodeling box (Photo 6). Gently fold any excess wire into the boxes, then screw the switches into place. Be careful not to apply so much pressure that you loosen the box.
Install the cover plates, then turn on the power. Ideally, both toggles should be in the up or down position when the light is off. If necessary, remove the second switch, rotate it 180 degrees in the box, then reattach it so the two toggle positions are coordinated.
You might find two 14-2 cables in the existing electrical box instead of the one we show in Photo 1. There may also be other cables present. Don't worry. Regardless of what you find in the existing box, the wiring for the three-way switches will not change. You only need to focus on the two wires connected to the existing switch.
Keep the other connections the same, even if you have to disconnect them when you change to a larger box. The two wires you unhook from the old switch and the three wires you'll add from the new 14-3 cable are the only wires you need to work with.
Sizing the Box
The National Electrical Code requires electrical boxes to have sufficient volume to hold all the wires, switches, clamps and other components that you intend to put inside them. You have to calculate the minimum size required for each box.
The basic rules are:
- Add 1 for each hot or neutral
- Add 1 for all ground wires combined
- Add 1 for all internal cable clamps combined
- Add 2 for each switch, or receptacle
- Multiply by 2 cu. in. for size 14 wire or 2.25 cu. in. for size 12 wire
For example, our first switch location (Photo 4) has:
Hot wires: 5
Ground wires: 1
Clamps: 0
Switch: 2
Total: 8
8 x 2 cu. in. (size 14 wire) = 16 cu. in.
Remodeling boxes have the volume or the number of wires that it can contain stamped onto the inside back of the box. To determine the volume of a metal box, measure and multiply the inside height by the width and the depth.
Required Tools for this Project
Have the necessary tools for this DIY project lined up before you start—you'll save time and frustration.
You'll also need a fishtape. And, if you need to run the cable through finished walls, you'll also need tools for patching and painting the holes in the walls.
Required Materials for this Project
Avoid last-minute shopping trips by having all your materials ready ahead of time. Here's a list.
Similar Projects
How to Add an Outlet to an Existing Three-way Switch
Source: https://www.familyhandyman.com/project/how-to-install-a-3-way-switch/